Watch our video "KeyCreator Pro 2022 Materials Link Enhancements"
KeyCreator Pro 2022 provides new capabilities for managing different types of materials. This video demonstrates how to use the Material Name property and a new set of options to optionally change material name on entities.
Video Transcript:
Face Material Name Property Management
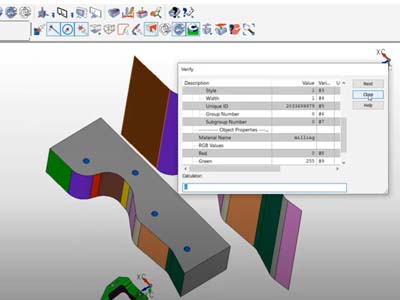
Improved link between the materials found in a splitter window and the appropriate faces that are using those materials. OK, so let's go ahead and take a quick look here. I'm going to do a verify entity on this face right here. You'll see that it's attribute for material name is CNC, and those RGB colors are assigned to that material. I also use that same name over here on this particular piece of tooling. Also called CNC.
So to show that link, let's go ahead, I'm going to go ahead and edit this particular CNC, I'm going to go ahead and say, change the name, we're going to call it milling. And I might also want to change the color, let's go with the bright green. And say, OK. Now you get the prompt, this is what we saw in the slide. What do you want this new material, the material that was just edited and that used a previous settings to apply these new settings. You say yes, and now you see that all that has changed, including the name. It's now called milling instead of CNC.
You can also use these color attributes - material attributes for selection. So, for example, here I have something in here where I call it standard bore sizes, again, this is standard tooling that may be the standard in your company for certain size counter bores or certain size pinholes, or maybe to help identify tapped holes. You can set up different color schemes. Obviously, we have that set up for mold work here as well. And so what I can do now is I can go ahead and filter on those particular settings. Let's go ahead and do a remove feature, all displayed, by type. And you can see anywhere there's a materials pull down list, the materials now have a preview of that particular color and also has the name. So let's go ahead and remove all my standard counter bore sizes. I'm going to remove the wire EDM. And I'm also just going to remove something called parting line because I know that's going across the other geometry. I’ll say OK and you'll see how it highlighted those particular faces. These blends here are the parting line faces on the block and the sheet body. I can go ahead and do a remove.
Another thing we've done was to handle transparency better. In the past, we did not have this option. All right, so in the past, this was hard coded to be on. I'm going to go ahead and turn that off here. Say Yes. So now if I come over to this example here, I'm going to go ahead and do a verify on this face. You'll see that face as a material property called default, right? She's in this list. Well, I'm going to go ahead now and apply that to a face, and we take the transparency and apply it to here. And yes, I can see inside the block. But - if I go and verify that, material name has taken on this transparency name, it may have taken on any of the attributes associated with it. And that's not what I want. Let's go ahead and cancel and undo this. The idea behind this switch is this is just a temporary visual effect I just want to see inside the part, I don't want to change the materials. And so that's what they apply material name now does when that is unchecked. Yes, there are no other transparencies. I do the same thing and apply it. You can see inside my part. Verify that and that maintained the default color name that was there in that no longer has any of the transparency's names. So we've done that in cases where you want to just temporarily change something for visual effects or to highlight. And that also applies to things here to create either create a new material. Or to apply a new name, those will also be there.

